Stitches with texture are always a “must” in any knitter’s tool box. They allow us to give a special and surprising touch to our garments without much bother. The pistachio stitch, which we’ll teach you how to knit in today’s tutorial, is without doubt, one of those which look perfect in either wool or cotton. It will be great in your warmer cardigans and in your Spring tops.

For this step-by-step we have used one of our Pima cotton skeins and our size US 8 (5 mm) knitting needles. Do you have everything ready?
Before beginning, you must know how to work the following stitches:
- How to Cast on
- How to work the knit stitch
- How to work the purl stitch
- How to knit 2 together
- How to Slip, Knit, Pass Over (SKPO)

To work this stitch you will need to cast on a number of stitches multiple of 4.

Row 1 (right side): knit all stitches.

Row 2 (wrong side): purl all stitches.

Rows 3 and 4: repeat rows 1 and 2.
On the next row we will start to make longer stitches to create the nice “V’s” that from this stitch. The lomger stitches are worked the same as the regular knit stitch, but by inserting the needle a few rows below of where we should (in this case, we insert the needle 3 rows below).

Row 5 (right side): knit 2. *Work 1 elongated stitch by inserting the needle into the space between the second and third stitch (from the last you worked) 3 rows below. Knit the next 4 stitches and work 1 elongated stitch by inserting the needle into the same place as for the previous elongated stitch*. Repeat from * to * until there are 2 stitches left, and knit them.
In order for you to better see how to work the elongated stitches, we have prepared a short video:
When you work these stitches, keep in mind not tighten up too much the strands of the stitch, so it doesn’t shrink.
Row 6 (wrong side): purl 2. *Slip the elongated stitch with the yarn in front of your work, purl 4 and slip the elongated stitch with the yarn in front of your work*. Repeat from * to * until there are 2 stitches left and purl them.

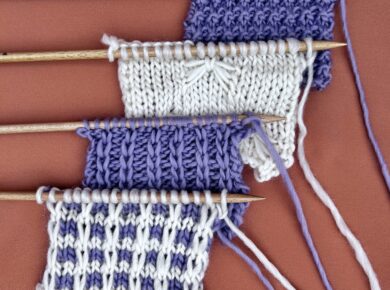
In the picture above you can see the position in which the strand you’re working with must be (in front of your work) and the position in which you have to slip the elongated stitch from one needle to the other.

When you finish the row, you will notice your work looks like the picture above.

Row 7 (right side): knit 2. *SKPO (passing the elongated stitch over the next stitch), knit 2 and knit 2 together (the next stitch and the elongated stitch)*. Repeat from * to * until there are 2 stitches and knit them.
If this row is a bit complicated, with the SKPO’s and knit 2 togethers, you can follow step by step in the following video:
As you can see, row 7 is worked pretty fast. The SKPO’s and knit 2 togethers create our “V”.

Row 8 (wrong side): purl all stitches.

Row 9 (right side): knit 4. *Work 1 elongated stitch by inserting the needle into the space between the second and third stitch (from the last you worked) 3 rows below. Knit the next 4 stitches and work 1 elongated stitch by inserting the needle into the same place as for the previous elongated stitch*. Repeat from * to * until there are 4 stitches left, and knit them.

Row 10 (wrong side): purl 4. *Slip the elongated stitch with the yarn in front of your work, purl 4 and slip the elongated stitch with the yarn in front of your work*. Repeat from * to * until there are 4 stitches left and purl them.

Row 11 (right side): knit 4. *SKPO (passing the elongated stitch over the next stitch), knit 2 and knit 2 together (the next stitch and the elongated stitch)*. Repeat from * to * until there are 4 stitches and knit them.

Continue working repeating rows 4 to 11 until the desired length.
We hope this stitch is useful to you, and it helps give a different texture and touch to your knitted garments. As usual, we will love to see what you create on social networks with the hashtag #weareknitters. Until next time!